Well, hopefully this page will make this easier for you. But please note that with every update to your phone or computer, THINGS CHANGE. This is our best guess from Spring 2015 – and this is a special page created just for YOU by Margi Miller, you class teaching assistant, after asking some other former Newbies for their input.
Before You Start (a note from DHC)
There are some great notes about improving your videos below – but if you’re just starting, I say “Do it waaaay bad!” – just get it out there. You will have the option of whether to share it outside this classroom or not, and you don’t have to share anything you don’t want to. So just jump in and get ‘something’ on video.
Videotaping with an iPhone
First, we’ll start with how to do this with an iPhone, the simplest way (we’ll try to answer comments and questions like “don’t have an iPhone, don’t have a friend with an iPhone, etc. as they come).
- You’ll need to create a YouTube Account. This page (I like pages for Dummies) seems to be the simplest: http://www.dummies.com/how-to/content/how-to-create-a-youtube-account.html Sorry about all the ads. You can also look at the page in the sidebar called module called “How to Upload a Video on YouTube.” The section entitled, “Here’s the WRITTEN version” will give you a quick idea of how to create a YouTube account.
- Now, here’s the SIMPLEST way to videotape yourself and upload it to YouTube: An iPhone 4 is shown in this video but this will work on an iPhone 5 as well: https://www.youtube.com/watch?v=lvtyV5EBTas
- Like what you see on your videotape – or not? Here’s a site that shows you how to get better and better at videotaping. It’s worth watching even if you get lost half-way through: http://wistia.com/learning/shooting-video-with-an-iphone
Note: if you already have your video on your computer, (some people have this already set up to happen from a camera or a webcam), then see the page talked about earlier, “How to Upload a Video on YouTube.”
Some things we have learned JUST for harp videos.
You will probably improve upon these yourselves (and DHC says again: ignore all this if you’re getting started then come back and add it in little by little after you’ve gotten the basics of just getting ANY video and figuring out ANY way to get it online)
- Pay attention to your lighting and the placement of your camera. You want your hands, your harp, your face, and your expressions all to SHINE. This will mean moving your phone or camera around and positioning it from various angles until you find one you like.
- Pay attention to your sound. For this class, it’s fine to use your phone or camera as is and just pay attention to WHERE you are filming. Again, TRY different things, like a room with less (or more) absorbing elements or try using the earphone/mike attachment that came with your phone and place the mike part of it closer to your soundboard.
- Look your best without being camera shy. Make the camera your friend!!!! Interacting with it as if it were a person you are playing for is essential. Play to it (not in front of it). Gesture to it, speak to it. This is what the class is all about: your audience!
- You may find yourself videotaping over and over again. (Some classmates in the past have reported as many as 15 takes!!!) (DHC says: “I’ve gotten private accounts of students that are more like 70”) BUT you learn something each take if you can accept yourself. Again, this is what the class is about! Put some space between filming sessions. Calm down, laugh, be proud of yourself.
Tips from other classmates + DHC:
1. Kate says:
If you’re hearing ‘distortion’ (sounds crackly) you might have TOO MUCH sound. Good to check the playback for the loudest spots and make sure they’re not distorted on playback. (“That is my pet peeve for a lot of amateur videos,” Kate adds.) (“I’ve given up on never having distortion,” says DHC, “so a lot of times I just live with it if the rest of the take is OK.”)
2. Low battery on a mic can also create a distorted sound – so that’s another thing you can check. Or just use your computer’s internal mic and don’t worry if it sounds a little weird.
3. Emily writes:
After I got comfortable with the process, I did the videotaping by myself in the BLUES class. However, my daughter held the iPhone during my first attempt. Having someone else look at the picture/focus/setting without my having to get up and down from my seat was very helpful. She was able to see how I was fitting into the frame, what my hands and body looked like under the lighting, etc. For that very first time, it made the taping go more smoothly for me.
I’m somewhat tall – and need to have the camera (either iPhone or iPad mini) far enough away to get my whole head and body in the picture (Ha – maybe I could have become the “Headless Harper!) That means: every time I want to stop the video or check it, I have to get out of my seat to touch it. I don’t have a remote. I found the constant getting up and down annoying (especially since I’m one of the ones who took 15 takes!)
I was looking for my “best” video – hence, the many “takes.” However, I finally decided to go with one that was GOOD ENOUGH. (I got TIRED of filming!) Actually, GOOD ENOUGH was good enough! I think that the more we do this, the more comfortable we will get with the process. Before my DHC BLUES course, I had never watched myself play. Taping was truly and eye-opener! I learned a lot about my hands (thinking that I was closing fingers and lifting when I actually wasn’t etc.) I really thank DHC for taking me so far out of my comfort zone – it is REALLY worth the effort.
4. Kathy says:
I happened to use my iPad because it was easier to prop up (I don’t have a helper, usually.) But the information is essentially the same. You can download your video straight from the device to YouTube, as he shows. But, I often needed to cut off some “dead” time at the beginning or end, to avoid going over the time limit. In that case, I uploaded the video to my computer, and used QuickTime to delete those segments. Believe me, I am not all that tech savvy, and it was fairly easy. Then save it and upload to YouTube from there.
Getting a video that was “good enough” seemed to require many takes for me, but as Emily says, it is a great learning experience to watch the playback and see what I REALLY did, as opposed to what I THOUGHT I did!
As I mentioned somewhere else, the lighting changed as I did many takes over the course of an afternoon. So by the final version, which was musically best, the lighting was poor. I just didn’t notice the change in ambient light as the afternoon progressed. I was much too tired to do it again with better light, so it went out as my ‘imperfect completion.
The opportunity to get feedback from DHC is priceless, and worth any effort it takes to get the video out there. She made several cool suggestions in response to my half-baked Blues project, most of which I incorporated into the final version. Her enthusiasm is unbridled, and comments always supportive. Just do it!
5. Harriet adds:
I was able to get a decent video after much experimentation using my iPhone, a camera tripod, and a cellphone holder that I purchased on eBay. This was my first experience videoing myself and I never got fancy with editing or adding captions because i ran out of time. However, I found that I had to pay close attention to the amount and direction of the lighting, or the phone would be adjusting itself dramatically while I was recording. I deleted several of my better recordings because the visual recording (light fluctuation) was so annoying. This meant moving my harp to another room for the final and also playing with the direction that the harp and I were facing. I kept the tripod almost within arm’s reach for convenience but it would have been less convenient had I wanted to get more of my self and the whole harp in view.
I would recommend following DHC’s advice to pay attention to what else (in the background) will be in the video and how you want to look, even when you are certain that this take will not be the one you use.
As far as transitioning from the half-baked to the still imperfect “final” version, I would say that it’s well worth the effort to do both. It’s a wonderful opportunity to get feedback from DHC and be able to ask questions about it. What I also learned though, was that having made improvements and corrections, there were still qualities in my half-baked version that I really liked and that did not come through in my final (although I wish they had), because I was playing it at a different time and that also affected the character of it. .. What I’m trying to say is –“different” instead of “linear – better.
6. DHC adds: If you have a Mac, you can use the app called “Photobooth” along with your webcam (either an external webcam or your built-in). It’s very simple and low-tech but it works! Here’s what to do in “Photobooth”:
1. Open the app and you should see yourself via your webcam
2. Select the ‘video’ icon (the icons on my Photobooth are just under the image I’m seeing of myself on the left side) and there are 3 of them (see the image).
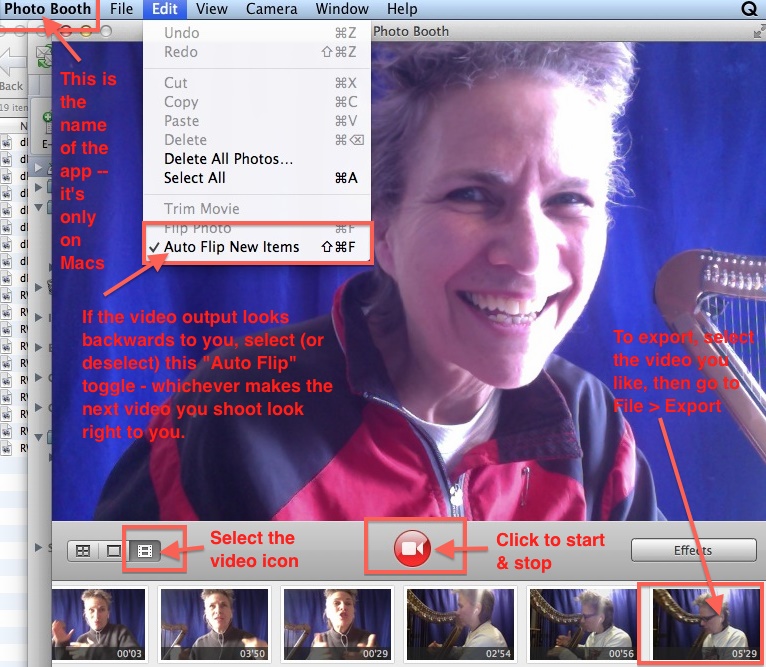
3. Click the red videocam icon to start and stop the taping
4. Export the video you want by selecting it from the catalog of videos at the bottom of the window, and then go to File > Export
5. If the video you exported looks backwards, then toggle “Auto Flip New Items” (see image) – and the next videos you take will be flipped in the ‘right’ direction