Like any student or creative professional, you’ll need supplies and a way to organize your materials. If you have time to get organizational supplies this week – or if you already have what you need, that’s great. If you don’t, then find a way to create a similar organizational structure for your coursework until you can get the materials you need.
If you already have a favorite way you like to organize your music and practice materials, then use your system but just look through mine to see if there are any additions or adjustments you might want to make based on what I do – or what any of the other students in the course do.
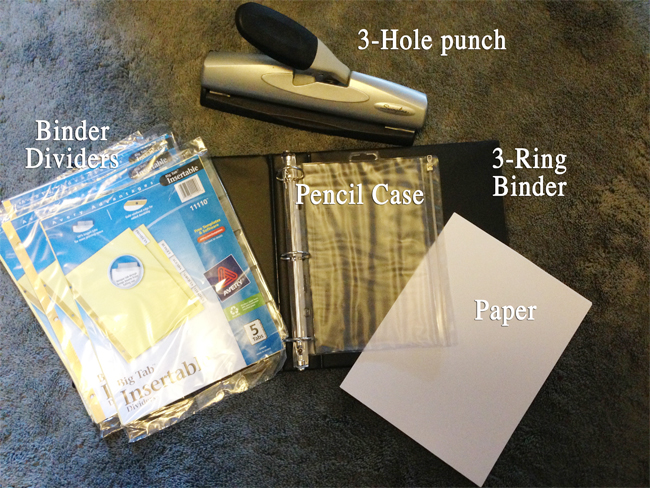
Here are the supplies I have for setting up my binders:
- A 3-ring binder (or 2-ring binder) (I like the kind that lets me insert a spine and a cover)
- Binder dividers
- A 2- or 3-hole punch (depending on whether your binder has 2 or 3 rings – different countries have different conventions in binders)
- A pencil case that fits in the binder (I keep my pencils, my coins and sometimes my tuner in it)
- Paper
Two Binders in One: Resources & Performance
When I take an online course, my binder may look like it has a lot of segments – but I see a “learning binder” as two notebooks in one – that may eventually be separated into two notebooks. Those two notebooks are:
A. Course Resource Notebook
This part is the things that you learn and may want to review- the Worksheets, Modules & Questions. They will eventually live in a different notebook that simply becomes a resource you go back to if you want to review the course.
B. Your Gigging or Performance Notebook
This part of the notebook is the materials you would actually play from: lead-sheets, one-sheets with arrangement tools, performance prep checklists.
The lead sheets, sheet music or notes for the tunes you’ll play will probably be kept either in alphabetical order, organized by genre, or organized by ‘set lists’ (tunes you play together) – depending on what works for you. I use different systems at different times based on whatever will make my current goal easier..
This will eventually become your gigging notebook – it’ll have everything you need in it to take your repertoire around with you. Some people like to put it on an iPad so they have a digital copy at all times, and it’s fine for you to do that with the materials you get in the Academy, so long as you don’t share those materials with others.
But for now – while you’re TAKING the course – I recommend keeping them in the same notebook – because that’s one less thing to misplace.
How I ogranize & archive my binders (Click to Open)
I generally set up my binders like this, whether it’s for a course or for a project or a gi:
These sections will eventually become your gigging binder:
- Contact information (this may be irrelevant for this course, I just always have it at the front or top of any organization)
- Timeline / Calendar / Schedule
- Resources & Things to Know – This is a segment I started adding because there are always things I just kind of ‘need to know’ before I head into a project. Sometimes they’re logistical things and sometimes they’re mindset things, and sometimes the answers to questions I had. Sometimes I put this near the front of the binder and sometimes near the back.
- Repertoire List – This is where you’ll keep an overview of your repertoire – a list of the tunes you want to play as well as the ones you’re already playing
- Lead Sheets & Manuscript – These are the actual sheets of music you’ll play from. Normally you’ll put them in alphabetical order.
- Questions for Experts – this is the place where I keep questions I want to ask. I started doing this when I was first learning to write for symphony, and I had a gazillion questions – some were for specific instrumentalists and others for the conductor, or the music librarian. I couldn’t just call these people up every time I had a question, so I started collecting my questions, based on who could anser them, so when I had access to those experts I could ask them. That’s why I call it “Questions for Experts.”
- Blank paper: I like having easy access to blank paper so I can add notes or ideas
These will eventually become an archive of the course and you’ll put them in a separate binder:
- Worksheets – I like to have a separate divider for the worksheets because I often forget what module I got them in, and since I want to use them over and over again, I want them to be easy-to-find. Sometimes I put them behind the Modules and sometimes in front.
- Modules 1, 2, 3 … – I like to have a separate divider for the handouts, notes & homework for each module – so a 10-week course would have 10 different dividers (you can see two different ways I might do this in the photos on the previous page)
- Archives & Dregs: Pages you think you can probably throw away, but you’re not sure yet.
You’ll see variations on this in the photos – but the above list is how I’d probably set up my binder for this course.
In some ways, ‘organizing’ our work is a way of imposing structure from OUTSIDE … whereas using any of the structures in my courses – from the 12-Bar blues to a standard arrangement form — seems more like using structure to build something from the inside.
By creating binders and folders on my computer for a course, I’m creating a place to recreate a structure that already exists. In a physical world, you might buy a book, which would already have that structure outlined. In the digital world – I finally realized after taking many courses – you have to recreate that structure yourself.
A Few Binder Tips
A Few Binder Tips
- I almost never use ½” (thin) binders. I almost always use binders that are at least 1” wide and often as much as 2” wide. I do that to make space for additional materials, and also because it’s easier to flip and find pages when the notebook is a little larger.
- I always have a few more binder dividers for sections I haven’t thought of yet, and I put them in the pocket at the back of the binder.
Binder Labels (Click to open)
Binder Labels
Below is a video I included about Binder Labels in my Summer Harp Jam course. I’m including it here to show how I use my Playbook Binder cover so you can create your own or just use the Hip Harp Academy Playbook Binder cover below.
Download the audio for this video in the SoundCloud player below by clicking the download icon (the arrow pointing to the horizontal line) in the righthand corner.
NOTE: The player may take a little while to load. You may need to refresh your page or leave the page for a little while and then come back to give it time to show up. When the player appears, it should show up right below this sentence.
Download the binder label for Hip Harp Academy here or by clicking on the image below after reading the toggle above about “Binder Labels”


0 Comments